Hey there! Welcome to our guide on setting up Kong API Gateway. Kong is a popular open-source platform designed to secure, manage, and extend your APIs and microservices. It provides functionalities like authentication, rate-limiting, logging, and more. This guide will walk you through setting up Kong API Gateway, providing a step-by-step process to get started. We’ll cover everything from installation to configuration, including how to manage routes, plugins, and services.
Table of Contents
🚜 Installation
Code Blocks
- Install helm
Helm is a package manager for Kubernetes. Helm simplifies the deployment and management of applications on Kubernetes by providing a way to define, install, and upgrade even the most complex Kubernetes applications.
brew install helm- Add the Kong helm chart repository to your local helm installation
helm repo add kong https://charts.konghq.comCode language: JavaScript (javascript)- install Kong on the Kubernetes cluster with default configurations
helm install release_name -n namespace kong/kongCode language: PHP (php)- test installation
- list all the releases of helm charts installed on Kubernetes Cluster within the particular namespace
helm list -n namespaceCode language: PHP (php)- check the status of a release
helm status release_name -n namespaceCode language: PHP (php)- on successful execution, the above command will provide the release status as shown below
$ helm status release_name -n namespace
NAME: release_name
LAST DEPLOYED: Wed Jun 14 16:17:58 2023
NAMESPACE: namespace
STATUS: deployed
REVISION: 3
TEST SUITE: None
NOTES: To connect to Kong, please execute the following commands:
HOST=$(kubectl get svc --namespace namespace release_name-kong-proxy -o jsonpath='{.status.loadBalancer.ingress[0].ip}')
PORT=$(kubectl get svc --namespace namespace release_name-kong-proxy -o jsonpath='{.spec.ports[0].port}') export PROXY_IP=${HOST}:${PORT}
curl $PROXY_IP
Once installed, please follow along the getting started guide to start using Kong: https://docs.konghq.com/kubernetes-ingress-controller/latest/guides/getting-started/- get the host and port with the help of commands in the above response and check the connection to Kong with curl
- if the curl gives the below response, Kong has been installed successfully
{ "message":"no Route matched with those values" }Code language: JSON / JSON with Comments (json)- Installation is complete now 🎉
👩🏼💼 Setup Admin API
Introduction
The Kong Admin API is an interface that allows you to manage and configure the Kong API Gateway. Setting up the Admin API provides a convenient way to perform administrative tasks programmatically, such as managing API routes, plugins, consumers, and more.
Code Blocks
- Enable Admin API on Kong
- By default, the Admin API is disabled in Kong. To enable it you need to modify the Kong configuration file(
kong.conforkong.yaml) and set theenabled: trueunder the admin section
# Specify Kong admin API service and listener configuration
admin:
# Enable creating a Kubernetes service for the admin API
# Disabling this is recommended for most ingress controller configurations
# Enterprise users that wish to use Kong Manager with the controller should enable this
enabled: true
type: NodePort
loadBalancerClass:
# To specify annotations or labels for the admin service, add them to the respective
# "annotations" or "labels" dictionaries below.
annotations: {}
#  service.beta.kubernetes.io/aws-load-balancer-proxy-protocol: "*"
labels: {}

http:
  # Enable plaintext HTTP listen for the admin API
  # Disabling this and using a TLS listen only is recommended for most configuration
  enabled: false
  servicePort: 8001
  containerPort: 8001
  # Set a nodePort which is available if service type is NodePort
  # nodePort: 32080
  # Additional listen parameters, e.g. "reuseport", "backlog=16384"
  parameters: []

tls:
  # Enable HTTPS listen for the admin API
  enabled: true
  servicePort: 8444
  containerPort: 8444
  # Set a target port for the TLS port in the admin API service, useful when using TLS
  # termination on an ELB.
  # overrideServiceTargetPort: 8000# Set a nodePort which is available if service type is NodePort
  # nodePort: 32443
  # Additional listen parameters, e.g. "reuseport", "backlog=16384"
  parameters:
  - http2# Specify the CA certificate to use for TLS verification of the Admin API client by:
  # - secretName - the secret must contain a key named "tls.crt" with the PEM-encoded certificate.
  # - caBundle (PEM-encoded certificate string).
  # If both are set, caBundle takes precedence.
  client:
    caBundle: ""
    secretName: ""Code language: PHP (php)
# Kong admin ingress settings. Useful if you want to expose the Admin
# API of Kong outside the k8s cluster.
ingress:
# Enable/disable exposure using ingress.
enabled: false
ingressClassName:
# TLS secret name.
# tls: kong-admin.example.com-tls
# Ingress hostname
hostname:
# Map of ingress annotations.
annotations: {}
# Ingress path.
path: /
# Each path in an Ingress is required to have a corresponding path type. (ImplementationSpecific/Exact/Prefix)
pathType: ImplementationSpecificCode language: PHP (php)- Helm upgrade
helm upgrade <release_name> -n <namespace> <chart_name>Code language: HTML, XML (xml)- Add basic auth credentials under the consumer block
consumers:
- basicauth_credentials:
- password: ****************
username: admin- Add admin API service to Kong API Gateway, by adding the below code block under the services block in
kong.yaml
- connect_timeout: 60000
enabled: true
host: 127.0.0.1
name: admin-api
plugins:
- config:
    anonymous: null
    hide_credentials: false
  enabled: true
  name: basic-auth
  protocols:
  - http
  - https
port: 8001
protocol: http
read_timeout: 60000
retries: 5
routes:
- https_redirect_status_code: 426
  name: admin-api-route
  path_handling: v0
  paths:
  - /admin-api
  preserve_host: false
  protocols:
  - http
  - https
  regex_priority: 0
  request_buffering: true
  response_buffering: true
  strip_path: true
write_timeout: 60000Code language: PHP (php)
Test Connections
- To check if the Admin API of Kong is working, you can send a request to one of the endpoints provided by the Admin API and verify the response e.g:
curl http://<kong-host>:<kong-port>/servicesCode language: HTML, XML (xml)Check the response from the API. If the Admin API is working correctly, you should receive the below response
{ "data": [{ "id": "0aijd9f0-b992-4357-939d-bf593e6sw431", "port":80, "name": "example-service" ...}, ...]}Code language: JSON / JSON with Comments (json)🤖 Setting up decK
Prerequisites
- Ensure that you have access to the Kong Admin API. The Admin API provides access to Kong’s configuration.
- By default, the Kong Admin API listens on
http://localhost:8001
Introduction
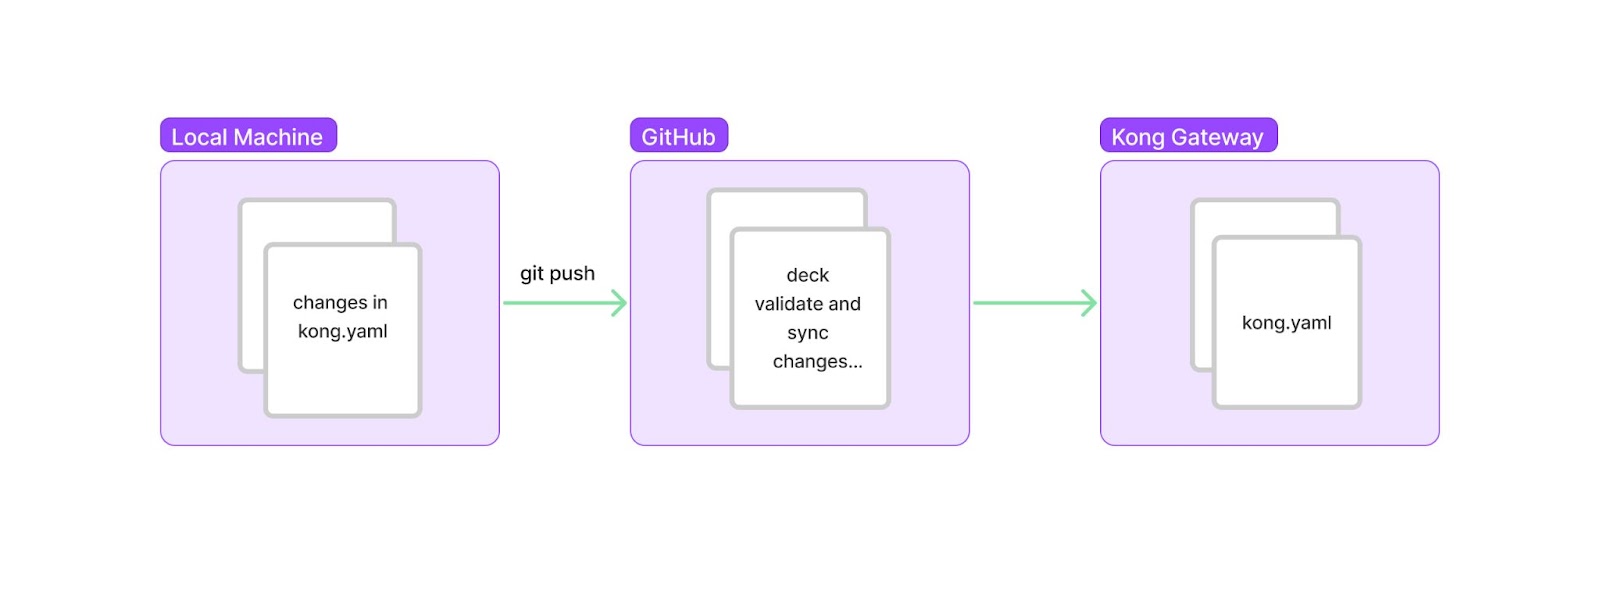
decK is a command-line tool that helps to manage and version control Kong configuration. By integrating decK with Github workflows, we can automate the deployment of Kong configuration whenever changes are made in the Github codebase.
Code Blocks
- Install deck
brew install deck- Check if decK is working
deck ping -kong-addr <kong_addres> -n namespaceCode language: HTML, XML (xml)- setup the GitHub repository
- clone the repository to your local machine
git clone git@github.com:organisation/repositoryCode language: PHP (php)- add .github directory
mkdir .githubCode language: CSS (css)- inside .github directory, create a workflows directory
mkdir workflows- now, to sync the changes pushed to the main branch with the running instance of Kong create a file
.github/workflows/sync.yamland add the below code snippet
name: Sync
on:
  push:
    branches: [ main ]
jobs:
  build:
    runs-on: ubuntu-latest
    steps:
      # Make sure checkout your git repository
      - uses: actions/checkout@v2
        name: "checkout"
      # Install decK
      - uses: kong/setup-deck@v1
      # Check the version of decK
     - run: deck version
     # Ping to your Kong instance
     - name: decK ping
       run: deck ping --headers ${{ secrets.AUTH_HEADERS }} --kong-addr
            ${{ secrets.KONG_ADDR }}
     # Check the structure of your files
     - name: decK validate
       run: deck validate --headers ${{ secrets.AUTH_HEADERS }}
            --kong-addr ${{ secrets.KONG_ADDR }}
     # Check diff between the files and the Kong instance
     - name: decK diff
       run: deck diff --headers ${{ secrets.AUTH_HEADERS }} --kong-addr
            ${{ secrets.KONG_ADDR }}
     # Sync the state of the files to the Kong instance and update the
       deployment status in your repo by GitHub Deployment API
     - name: decK sync
       run: deck sync --headers ${{ secrets.AUTH_HEADERS }} --kong-addr
${{ secrets.KONG_ADDR }} Code language: PHP (php)- To validate changes in a pull request to the main branch, create a file
.github/workflows/validate.yamland add the below code snippet.
name: CI
on:
  pull_request:
    branches: [ main ]
jobs:
  build:
    runs-on: ubuntu-latest
    steps:
      # Make sure checkout your git repository
      - uses: actions/checkout@v2
        name: "checkout"
      # Install decK
      - uses: kong/setup-deck@v1
      # Check the version of decK
      - run: deck version
      # Ping to your Kong instance
      - name: decK ping
        run: deck ping --headers ${{ secrets.AUTH_HEADERS }}
        --kong-addr ${{ secrets.KONG_ADDR }}
      # Check the structure of your files
      - name: decK validate
        run: deck validate --headers ${{ secrets.AUTH_HEADERS }}
             --kong-addr ${{ secrets.KONG_ADDR }}
      # Check diff between the files and the Kong instance
      - name: decK diff run: deck diff --headers
              ${{secrets.AUTH_HEADERS }} --kong-addr
${{secrets.KONG_ADDR }}Code language: PHP (php)- add
AUTH_HEADERSandKONG_ADDRsecrets to the GitHub repository - pull the current Kong configuration with decK and store it in the root of your repository
deck dump --headers "header" --kong-addr "address"Code language: JavaScript (javascript)- the directory tree should appear as shown below
repo-name └── .github └── workflows └── sync.yaml └── validate.yaml └── .gitignore └── kong.yamlCode language: CSS (css)- now, we can make and log changes to the Kong configuration by simply pushing changes in
kong.yamlfile
🔓 Adding CORS Plugin
Introduction
The CORS (Cross-Origin Resource Sharing) plugin allows you to configure Cross-Origin request handling in the Kong API Gateway. By adding the CORS plugin, you can control which origins are allowed to access your API resources.
Configure CORS
- Add the following code under plugins in
kong.yaml
plugins:
  - name: cors
    config:
      origins: <allowed_origins>
      methods: <allowed_methods>
      headers: <allowed_headers>
      max_age: <max_age>Code language: HTML, XML (xml)
🔗 Adding ACME Plugin
Introduction
The ACME Plugin in Kong allows you to automate the process of obtaining and renewing SSL/TLS certificates from Let’s Encrypt. By integrating the ACME plugin, you can easily secure your Kong services with valid SSL certificates.
Why is it required?
The ACME plugin is a crucial component in Kong due to its role in managing SSL/TLS certificates for secure communication over the internet. The ACME protocol, short for Automated Certificate Management Environment, is used to automate interactions between certificate authorities and servers to obtain, renew, and revoke SSL/TLS certificates.
Here are the reasons why the ACME plugin is required in Kong:
- Automatic Certificate Management: The ACME plugin simplifies the process of managing SSL/TLS certificates. It automates the process of obtaining, renewing, and revoking certificates, reducing the manual effort required. This is particularly important for large deployments where managing certificates manually would be impractical.
- Integration with Let’s Encrypt: The ACME protocol is widely adopted by many certificate authorities, including Let’s Encrypt, one of the largest free, automated, and open certificate authorities. The ACME plugin allows Kong to interact with Let’s Encrypt to easily obtain certificates for securing HTTPS traffic.
- Global Plugin Configuration: The ACME plugin can only be configured as a global plugin. This means it applies to all routes, services, and consumers within the Kong Gateway, ensuring consistent and comprehensive coverage of all traffic.
- Path Termination: The ACME plugin terminates the /.well-known/acme-challenge/ path for matching domains. This is part of the ACME challenge-response protocol used by Let’s Encrypt to verify domain ownership.
Configure ACME
- Add the following code under plugins in
kong.yaml
plugins:
  - name: acme
    config:
      account_email: <your_account_email>      domains:example.com      tos_accepted: trueCode language: HTML, XML (xml)
👀 Setup Monitoring
Introduction
Kong official documentation provides information about interaction with Prometheus for monitoring and logging purposes here. The Prometheus plugin in Kong allows you to expose metrics and monitor the performance of your Kong API Gateway using Prometheus. By integrating the Prometheus plugin, you can collect valuable insights into the traffic, latency, and error rates of your Kong services.
Enable Prometheus monitoring on Kong
- Add the following code under plugins in
kong.yaml
plugins:
  - name: prometheus
    enabled: trueCode language: JavaScript (javascript)
Add target to Prometheus
- Add the following code under scrape_configs in
prometheus.yaml
scrape_configs:
  - job_name: 'kong'
    metrics_path: '/metrics'
    static_configs:
      - targets: ['kong-host:8001']Code language: JavaScript (javascript)
🚢 Migrating a backend service to Kong
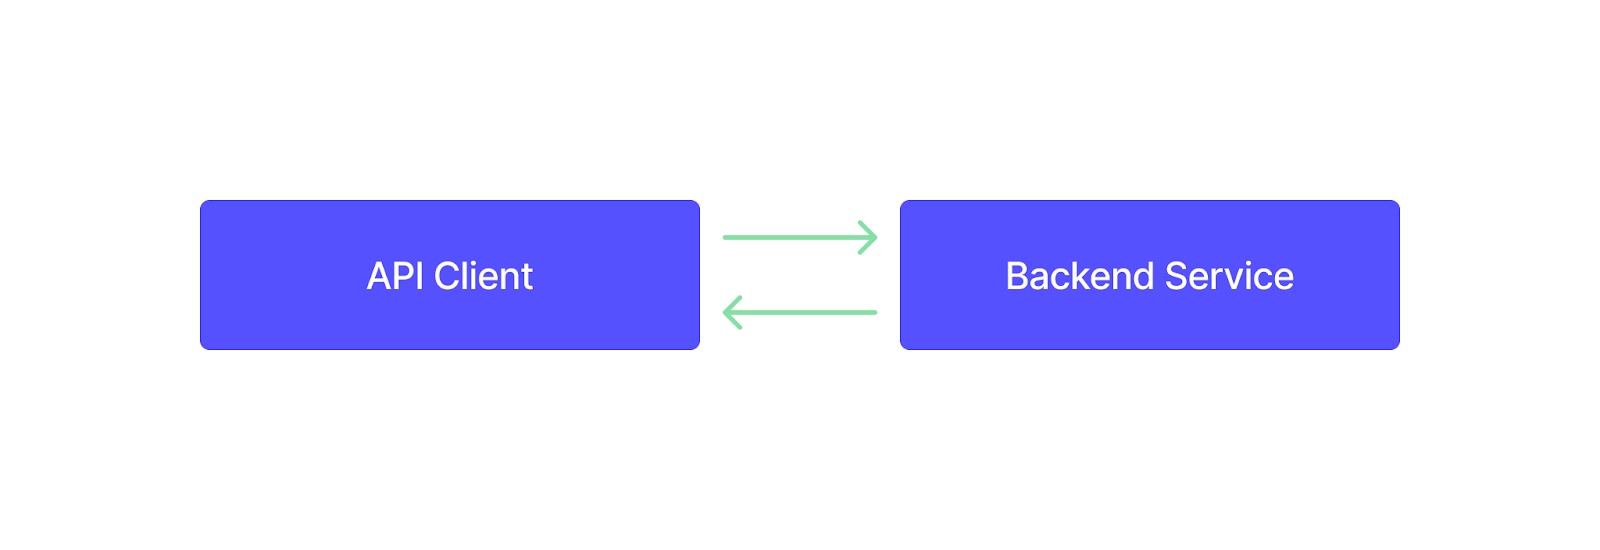
Initial Architecture
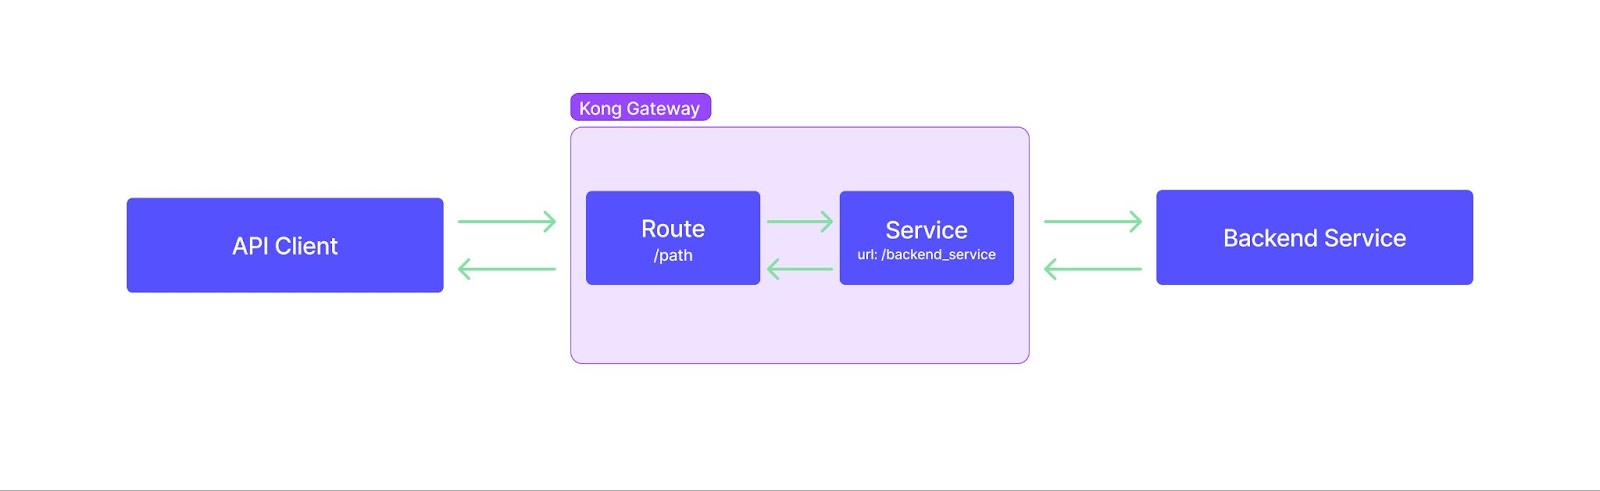
Final Architecture
Code Blocks
- define the configuration for your service in
kong.yaml
services:
  - name: your-service-name
    host: service-host-name
  routes:
    - name: your-route-name
      paths:
      - /your-route-path
upstreams:
name: service-host-name
targets:
target: <url of the kubernetes service, which you want to migrate on Kong>
      ## example: service-name.namespace.svc.cluster.local:80

Code language: HTML, XML (xml)
Here’s an explanation of each parameter in the provided configuration:
- services: a service is an abstraction of an existing upstream application.
- name: The name of the service. Choose a unique name to identify your service.
- host: the hostname where the service is hosted. It represents the backend service’s address that Kong will proxy requests to.
- routes: a route is a path to a resource within an upstream application
- name: The name of the route. It should be a unique name to avoid conflicts.
- paths: An array of paths of incoming requests that you want to map to the service.
- upstreams: refers to an API, application, or micro-service that Kong Gateway forwards requests to.
- name: the name of the upstream. It should be the same as the service host
- targets: the targets (backend services) associated with the upstream.
- target: This should be the URL where your backend service is accessible.
🎯 Conclusion
In conclusion, the implementation of Kong API Gateway can revolutionize the way you manage, secure, and optimise your APIs. Throughout this guide, we’ve walked through the essential steps required to set up Kong, configure its plugins, and leverage its powerful features to streamline your API management process.
We hope that this guide has given you the necessary understanding and confidence to start managing APIs using Kong.
📝 References
Kong API Gateway Documentation. Getting started with Kong
Kong API Gateway Documentation. Authentication and Security in Kong.

1 Comment
temp mail
Somebody essentially lend a hand to make significantly articles I’d state. That is the very first time I frequented your website page and up to now? I surprised with the research you made to make this actual submit amazing. Wonderful task!