Let’s Talk About Behaviour-Driven Testing!
Ever wonder how we make sure software clicks with you, the user? That’s where Behavior-Driven Testing (BDT) comes into play. It’s a cool way of checking software by looking at how you might interact with it in the real world.
BDT is all about creating tests that feel more like stories. We imagine different scenarios based on what you might do when using the software. This makes it super easy for everyone in the team to get what’s going on, even if they’re not tech wizards. It uses natural language specifications for effective communication. These specifications include plain language and keywords like “Describe,” “Context,” “When,” and “It” to describe scenarios and expected outcomes.
Now, you might hear BDT mentioned alongside BDD, or Behavior-Driven Development, and get them mixed up. They’re related but not the same. BDT is all about testing and making sure things work as expected. BDD, on the other hand, is a development framework.
- BDT is focused on testing, with an emphasis on the behaviour of a feature.
- BDD, on the other hand, comprises the entire development process, including requirements gathering, specification writing, and development of the feature, with testing being a part of this flow.
So, BDT is our way of making sure that, when you use the software, it feels just right.
Writing your first Ginkgo test
Ginkgo is a testing framework tailored explicitly for the Go programming language.
- Its primary purpose is to streamline the creation of behavior-driven tests. Ginkgo accomplishes this by offering a user-friendly syntax for composing test suites, cases, and assertions. This approach enhances the overall test-writing experience, improves test readability, and simplifies test maintenance.
- Ginkgo provides a rich set of built-in matchers for making assertions in tests. These matchers cover a wide range of scenarios and make it easier to write expressive and concise test cases.
There are some limitations to using Ginkgo as well:
- Developers who are accustomed to traditional testing frameworks, especially those with simpler syntax and conventions like Go’s built-in testing package, may find the transition to Ginkgo challenging initially.
- It has a dependency on Gomega.
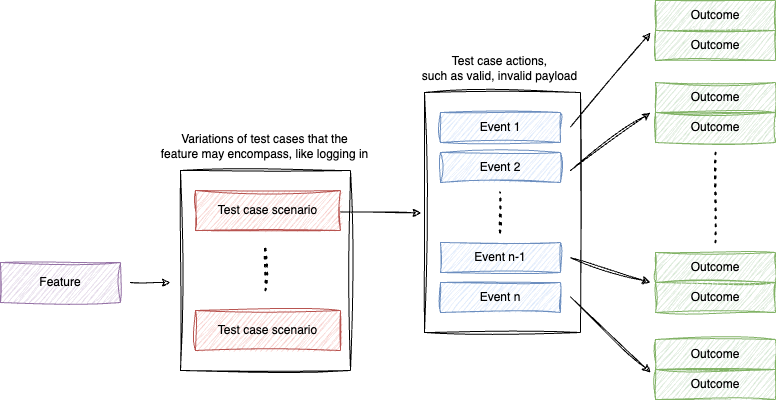
Ginkgo offers the following keywords for composing tests in the BDT framework:
Describe: To precisely portray various features or capabilities of your code
Context: This is to look into every possible situation for a feature to make sure your tests cover everything that could happen.
When: This tells you about the specific actions or steps taken during a test to see how the feature works.
It: This explains what you expect to happen when you test a feature, like the result you’re looking for after doing something.
The basic syntax used for writing tests:
func TestMain(t *testing.T) {
    RunSpecs(t, "Test suite name")
}

var _ = Describe("Feature", func() {
    Context("Test case scenario", func() {
        When("Event", func() {
            It("outcome 1", func() {
                // assertions
            })
            It("outcome 1", func() {
                // assertions
            })
        })
    })
})Code language: JavaScript (javascript)
Assertions :
To validate the behaviour of the code, you can use Gomega or Assert library. Gomega is best paired with Ginkgo for assertions. Examples of assertions using Gomega and Assert are shown below.
Import Gomega in your file
import "github.com/onsi/gomega"Code language: JavaScript (javascript)var _ = Describe("Login", func() {
Context("Logging in with valid request body", func() {
When("With correct credentials", func() {
It("should return user data", func() {
actualOutput, _ := testFunc()
Expect(actualOutput).To(Equal(expectedOutput)) })
It("should not return error", func() {
_, err := testFunc()
Expect(err)<strong>.</strong>ShouldNot(HaveOccurred()) })
})
})
})Code language: PHP (php)Using assert library
Import Assert in your file
import "github.com/stretchr/testify/assert"Code language: JavaScript (javascript)var _ = Describe("Login", func() {
Context("Logging in with valid request body", func() {
When("With correct credentials", func() {
It("should return user data", func() {
actualOutput, _ := testFunc()
assert.Equal(GinkgoT(), expectedOutput, actualOutput) })
It("should not return error", func() {
_, err := testFunc()
assert.NoError(GinkgoT(), err) })
})
})
})Code language: JavaScript (javascript)| Gomega | Assert |
| Gomega’s assertion syntaxes are written in a natural language style. Example: Expect(output).To(Equal(2)), this reads to “expect output to equal 2”. | Assert follows a traditional testing syntax. It uses functions like Equal, True, False, etc. |
| It offers a broader range of assertion matchers and more advanced features like asynchronous testing, custom matchers, and more. | It provides basic assertion functions. |
Ginkgo also provides functionality to set before and after hooks using BeforeEach, BeforeAll, AfterEach and AfterAll. What are these hooks? Let’s understand using an example.
Suppose you need to set up a common testing environment or perform common setup tasks before each test spec (test case) is executed. They are particularly useful when you need to ensure that certain conditions or prerequisites are met before running your tests.
- In some cases, you might have complex requirements that need to be initialised before each test, such as data structures or objects that your tests rely on. If your code depends on external services, databases, or APIs, you can use BeforeEach or BeforeAll to set up mock objects for these dependencies to isolate your tests from the real implementations.
- After allocating resources and setting up your requirements for a test spec, you would need the system in a clean state after the execution, that’s when you can use the AfterEach or AfterAll hook.
- These hooks are valuable for ensuring that resources are correctly released, temporary changes are reverted, or the system under test is left in a clean state after each test.
- AfterEach hook can also verify if expected calls were successful on the BeforeEach hooks.
Let’s understand what we have learned so far using an example.
type Login interface {
    testFunc()
}

type VerifyPayload interface {
    IsValid() bool
}

type login struct {
    VerifyPayload VerifyPayload
}

func (l *login) testFunc() {
    // Implement testFunc function
}

type mockVerifyPayload struct {
    mock.Mock
}

func (m *mockVerifyPayload) IsValid(loginData) {
    // Mock isValid function based on parameters
}

var _ = Describe("Login", func() {
    var(
        verifyPayloadMock *mockVerifyPayload
        login             Login
    )

    BeforeEach(func() {
        // mocking the behaviour for IsValid function
        verifyPayloadMock = &mockVerifyPayload{}
        login = &login{
            verifyPayload: &verifyPayloadMock
        }
        verifyPayloadMock.On("IsValid", []interface{}{loginData}).Return(true)
    })

    AfterEach(func() {
        // verify expectations if they were called as expected
        verifyPayloadMock.AssertExpectations(GinkgoT())
    })

    Context("Logging in with valid request body", func() {
        When("With correct credentials", func() {

            It("should return user data", func() {
                actualOutput, err := login.testFunc()
                Expect(actualOutput).To(Equal(expectedOutput))
            })

            It("should not return error", func() {
                actualOutput, err := login.testFunc()
                Expect(err).ShouldNot(HaveOccurred())
            })
        })
    })
})Code language: PHP (php)
Breaking down the above code
Step 1:
Mock all the interfaces on which the functionality being tested is dependent. Like in our code, the VerifyPayload interface defines a method IsValid() that returns a boolean value indicating whether the payload is valid or not, and the testFunc() method of the Login interface depends on the IsValid() method of VerifyPayload. Therefore, the login struct embeds the VerifyPayload interface.
Here, the mockVerifyPayload struct is a mock implementation of the VerifyPayload interface. It embeds a mock.Mock field for mocking.
Step 2:
Define a test suite using the Describe block like we have done for Login functionality in the above code snippet. The Describe block will contain the related test cases to test functionality or some behaviour of the code.
Step 3:
Declare the required variables.
Step 4:
Now add test cases using It block inside the Describe block. For making the test cases more expressive and readable, Context and When blocks can also be added within the Describe block.
Step 5:
As explained above about before and after hooks, set those hooks if they are necessary for the testing. Now, inside the BeforeEach hook, the behaviour of the IsValid method is mocked using the mockVerifyPayload instance and a login object is created with this mocked implementation. Expectations are set on the mock object to ensure that the IsValid method is called with the correct parameters.
For a better understanding, please refer to the Mocking section explained here.
Step 6:
Assert the result of the function if it returns the expected result.
Now, tests are all set up and ready to run!
Run your tests:
Prerequisites:
- Ensure that Go is installed on your system.
- Make sure that Ginkgo is installed.
If Ginkgo is not yet installed, you can proceed with the following steps:
- Install ginkgo using
go installcommand :
go env -w GO111MODULE=on
go install github.com/onsi/ginkgo/v2/ginkgo@latest- Make sure Go binary is in your PATH
go env GOPATH # /home/user/go
export PATH=$PATH:$(go env GOPATH)/binCode language: PHP (php)
Now, to verify if Ginkgo is installed successfully, run :
ginkgo version
To run your test suites, you can use ginkgo command.
You can alternatively execute tests by using the go test command. Navigate to the desired directory where you intend to run the tests and employ the mentioned command. For running all tests within your repository, you can use the following command in your root directory:
go test ./... -coverWhile you can technically run Ginkgo test suites using the standard Go go test command, the Ginkgo CLI is recommended and supported for several reasons. One of those reasons is parallel execution.
Parallel execution:
Ginkgo offers the ability to execute tests concurrently, leading to significant time savings when running extensive test suites. This feature proves invaluable when dealing with codebases that have comprehensive test coverage.
Mocking
Mocking is a technique employed to simulate the actions of external dependencies or calls when testing a function. This approach serves to segregate the code under examination, enabling a more concentrated examination of the method’s core logic.
For instance, consider an interface named verifyPayload that implements a method called IsPayloadValid. This method acts as a dependency for the Login function currently undergoing testing. Here’s a representation of the verfiyPayload interface:
type verifyPayload interface {
    IsPayloadValid(payload map[string]interface{}) bool
}Code language: PHP (php)
Next, it’s necessary to construct a mock struct that implements the interface.
type verifyPayloadMock struct {
    mock.Mock
}
For each method outlined in the interface, it’s essential to provide an implementation within the mock structure. Utilizing mock.Called() enables the recording of method invocations and the specification of desired return values. In the example below, args.Get(0) is employed to fetch the initial value, typically a boolean, and args.Get(1) retrieves the subsequent value, typically an error.
func(m *verifyPayloadMock) IsPayloadValid(payload map[string]interface{}) (bool, error) {
    args := m.Called(payload)
    Return args.Get(0).(bool), args.Get(1).(error)
}Code language: CSS (css)
Now, you need to create an instance for the mock of verifyPayload and define the expected behaviour for the dependency of the login method, i.e. IsPayloadValid method.
var _ = Describe("Login", func() {
    Context("Logging in with valid request body", func() {
        When("With correct credentials", func() {
            validPayload := map[string]interface{}{
                "email" : "test@test.com",
                "password" : "test",
            }

            BeforeEach(func() {
                verifyPayload := new(verifyPayloadMock)
                verifyPayload.On("IsPayloadValid", validPayload).Return(true, nil)
            })
            It("should return user data", func() {
                actualOutput, err := Login(validPayload)
                Expect(actualOutput).To(Equal(expectedOutput))
            })

            It("should not return error", func() {
                actualOutput, err := Login(validPayload)
                Expect(err)<strong>.</strong>ShouldNot(HaveOccurred())                        })
        })
    })
})Code language: PHP (php)
By employing mock.On(), you can establish distinct expectations based on different arguments. The result you get from the mocked function in the test depends on the specific arguments you use when you call that function.
Conclusion
We have only explored the basics of behaviour-driven testing, there’s a lot more to explore. This framework provides a lot of functionalities, from managing test suites to executing tests in parallel. The true power of Ginkgo lies in its ability to adapt to the project’s needs, enabling you to write tests that not only check for correctness but also ensure your software delivers the right experience to your users.
By using behaviour-driven testing in your development workflow, you’re taking a significant step toward creating more resilient, user-centric applications. As you keep using and learning more about Ginkgo, make sure your testing follows the ideas of being clear, working together, and focusing on what users need. This way, you’ll make sure your software works perfectly and helps your users in their daily lives.
Dive into the Ginkgo universe and become a testing superhero! Check out the Ginkgo docs and unleash the power of testing.
Read more shuru tech blogs here