Terraform can be really helpful for your infrastructure. It can reduce these issues and can speed up infrastructure-related work. Have you ever faced the following problems while setting up your infrastructure manually?
- The same Infrastructure is working in the staging environment but not in the production
- New changes caused downtimes or issues in infrastructure & reverting back new changes is taking time & which caused longer downtime.
- Your new changes started breaking something but now you don’t know what changes are causing this issue.
- Suddenly your infrastructure is facing some issues and you are unable to find what your team changed.
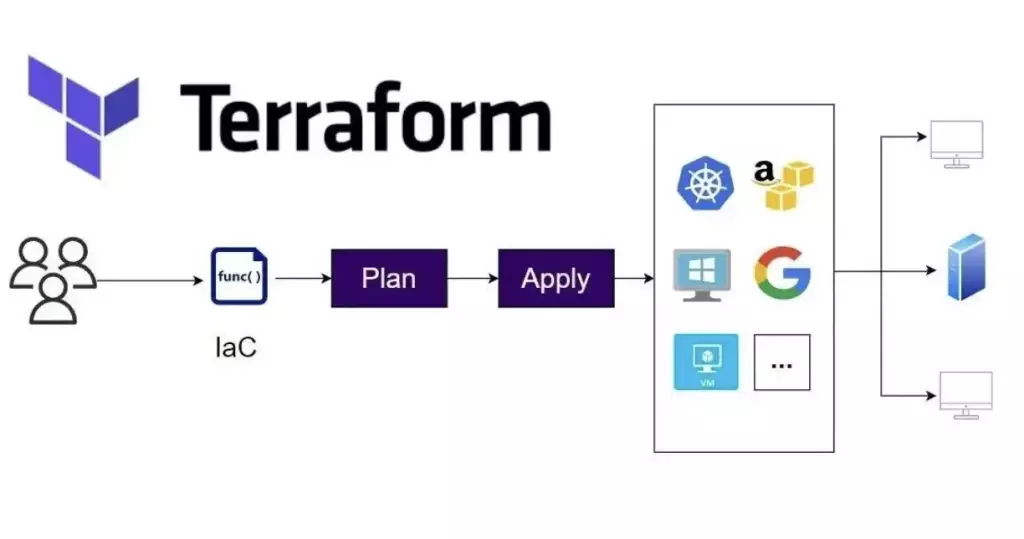
In this article, we will see how we can use Terraform to create & manage infrastructure, but before we create our first infrastructure using Terraform let’s see what Terraform is:
Terraform is an open-source infrastructure as code (IaC) tool developed by HashiCorp. It allows you to define and provision infrastructure resources in a declarative manner.
Some technical terms, right? Let’s understand these terms one-by-one to understand the definition fully:
Open Source:
Terraform is an open source tool which means that its code is available publicly & there are multiple benefits of open source tools like transparency, free (mostly), No vendor lock-in, customisability, Flexibility & community support. Developers contribute to these projects for the benefit of the community.
Infrastructure:
Infrastructure includes hardware, software, networks, data centres, servers, storage devices, operating systems, virtualisation technologies, and other components that are essential for the functioning of IT systems. In simple terms backend & frontend engineers develop applications but how these applications will be running, how these will be connected with each other & how requests will be forwarded to the Applications comes under the Infrastructure. For example, If backend engineers have developed an application then infra engineers will decide whether we should use the cloud for this. If yes then which one is it AWS, GCP OR Azure & then which technology, storage & configurations?
IAC (Infrastructure as Code):
This is the main highlight of this definition. Infrastructure as code means that you are going to write code to set up the infrastructure. You will not set up infra manually using command line tools or a console. This gives us lots of benefits:
- Tracking: Tracking is the primary benefit of IAC which helps us to check the state of our infra at any time. Using any version control system we can check when and what we changed in our infra. If we set up & manage infra manually then it is very hard & sometimes impossible to check at what time we changed something.
- Easy Debugging: Suppose we want to make some changes in our infra & after changing it suppose we start getting issues then we can go to our VCS & can check which last change caused this. And then we can fix that in the code and then we can update the infra with the updated code.
- Faster Rollbacks: Suppose we update our infra by committing a new commit & some systems start crashing & failing. Then we can quickly roll back the last commit & our infra will be back into the previous state.
- Less Risky: Manual changes are risky we might end up deleting or changing something we didn’t want to do & we might face some errors or even downtimes and then it might take a lot of time to find out what we just changed by mistake. But the code is reviewed multiple times before deploying it. So, it is less risky.
- Maintaining the same infra for different environments: We always have multiple environments like staging & production and we always make our changes to staging first then after testing we deploy the same changes in production. But if we create & manage infra manually then after testing in staging we have to repeat the exact same steps in production also there are chances that we might miss something or configure something wrong. Other than that it will take again the same time to create the same infra in production but if we use IAC we can just apply code in production which worked in staging & we will have the same infra in production.
HashiCorp:
It is a private organisation that developed Terraform. The tool is open source but HashiCorp developed & open-sourced it initially.
Declarative:
Imagine you have an application in AWS that is currently running on one VM. You want to increase the number of VMs for this application to two.
In a declarative approach, you would simply specify the desired state of your infrastructure, which is to have two VMs for this application. The tool would then figure out how to achieve this state, such as by destroying one VM if there are already three VMs, or creating a new VM if there are only one or two VMs.
In an imperative approach, you would specify the steps that need to be taken to increase the number of VMs, such as creating a new VM or destroying an existing VM. The tool would then execute those steps exactly as they are written, without considering the desired state of your infrastructure.
For example, if you use an imperative approach and you have three VMs when you run the code to create a new VM, the tool will create the new VM even though you already have the desired number of VMs (two).
Create a resource for Terraform:
Now that we have understood what is terraform, let’s do some practical work & see how we can create a resource with code:
So whenever we want to create a file on our system what do we do? We just go to our file manager & then create a new file or maybe we can run the command touch to create it. Both ways are manual, now in this first example, we will see how we can create a file in our local system with code using Terraform.
First, Install Terraform:
brew install hashicorp/tap/terraform
We are using Brew on Mac here, For any other platform or if you want to use any other method you can install it from here.
Now just create a file myFirstExample.tf in a directory and paste the following code:
resource "local_file" "dogs" {
  filename = "/Users/user1/learning/terraform/resource/dogs.txt"
  content = "I have 5 fully trained guard dogs"
}Code language: JavaScript (javascript)
Before executing the above code let’s first understand it:
In Terraform we use HCL (HashiCorp Configuration Language) and let’s understand the above example part by part with the HCL glossary:
“resource”
In the above example “resource” is a predefined keyword which is telling the type of this Block & HCL code consists of blocks that are identified with curly braces. The entire above example is an HCL block & one terraform file can have multiple blocks. An HCL block consists of arguments (filename & content in the above example ) that provide configuration data.
“local_file”
This is a predefined parameter that has two parts. One is “local” which is telling us about the Terraform Provider and the second is “file” which is the resource type. In HCL, Terraform Providers are similar to plugins that provide code for a particular resource. In the above example, we want to create a file locally on a computer so the Provider will be “local”, this provider provides code to perform actions related to file resources. If we want to set up a VM on AWS then the provider will be “AWS”.
Terraform providers are available on the HashiCorp Terraform Registry. Terraform downloads the code of the provider and uses it to complete the task. Anyone can submit their providers to the Terraform Registry, and they can have several predefined resources. When someone wants to create a resource, they specify the provider and the resource type. Terraform does not have to complete the task itself. It simply looks for the provider and, if it is found, uses the code of the provider to create or modify the resource.
This is why Terraform supports so many platforms. All other tools and platforms submit their providers to the Terraform Registry so that developers can use Terraform to write code to manage their resources.
So first there will be the provider’s name which is predefined (we can see the official names of different providers in the documentation) and every provider has some predefined resources which come after the underscore (“_”). And by this, that provider will know which resource you want to create or modify.
Now in the above example when we will execute the above code terraform will simply check if there is any provider with the name “local” If there is, then it will download that & now that provider will execute this block & from here its providers’ task to perform actions. Now local provider will check if there is a “file” resource it manages or not then it will check configuration data & will perform the task.
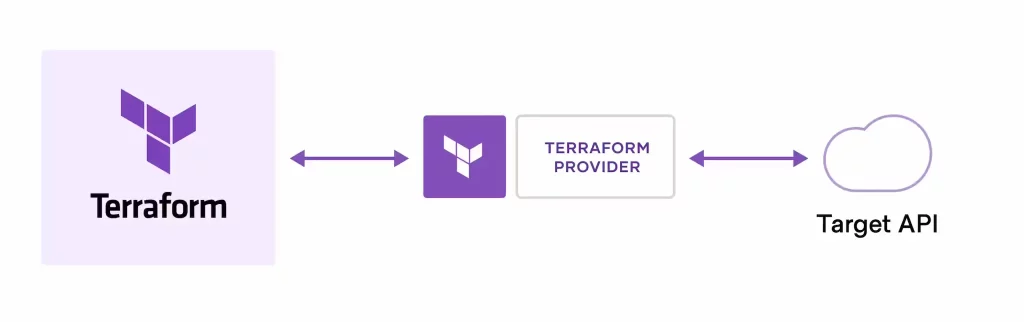
Image Source: Terraform
“dogs”
This is the logical name of the resource we are creating, it can be anything. When we want to point this resource in terraform code we will use it.
“filename & content”
In this resource block, we are passing two predefined arguments:
filenameandcontent. These arguments are mandatory, meaning that they must be specified in order to create the resource.
The
filenameargument specifies the name of the file to be created. Thecontentargument specifies the contents of the file.
There are also optional arguments that can be specified, such as
file_permission. This argument specifies the read-write permissions for the file.
The specific arguments that are available for a resource vary depending on the provider and the resource type. The official documentation for each provider will list the available arguments for each resource.
In this example, we are giving the full path to the
filenameargument. This means that the file will be created in that location. However, we could also specify a relative path, in which case the file would be created in the current working directory.
Executing the code:
- Run
terraform initcommand in the same directory where you created themyFirstExample.tffile. And if you will look into the terminal output you can see that it is downloading the “local” provider. This is what this command does this command simply downloads the code of all the Terraform Providers we mentioned in the.tffile. - Run
terraform plancommand & it will show you the plan by which it is going to execute that terraform code. This means that if you are creating a resource it will show that it will be making a resource with these configurations. It will show what it’s going to do to achieve the new state (We mentioned in the code), suppose you just changed the content then it will show you that it is going to create this resource again with only content change. This command does not execute the code, this just shows what Terraform will do when you will apply this code so that you can review it before applying. - Run
terraform applythis command will first print the plan again & it will ask you to confirm the execution by typing yes now Terraform will use those Providers to execute the code, since every Terraform Provider has code to deal with their predefined resources they will execute the code. And we will have new infra with the new state which we have in our code. Now you can check the file Terraform just created on that path we gave infilename.
Yeah…. 👏 you have created your first resource using Terraform
Some Important points to note:
- There are extensions or plugins in code editors which helps in code writing by providing suggestions & syntax highlighting. You can use extensions for different providers as well, if you are using Terraform with Azure then you can install Terraform for Azure plugin also.
- Terraform is platform agnostic, meaning we can use it with any platform & cloud provider.
- Terraform creates immutable resources which mean that whenever we change the code or configurations it will not update existing resources instead it creates new resource & destroys the previous one.
- You can use
terrafrom validatecommand to validate the syntax of a terraform code. - You can use
terraform destroycommand to destroy all the resources you created. It will only destroy resources you created using the.tffile in the directory where you are executing it. - One
.tfcan have multiple Terraform Providers & multiple resources. - Data Source: Using a data block Terraform can access resources managed outside of its scope also. For example, if we want to access the content of an already existing file & that file has nothing to do with Terraform then we can access it by using a data block.
Conclusion:
So, that’s all in this article, Terraform is a really good tool to set up infra, being an IAC tool Terraform gives us lots of benefits. It can save us from getting unintended issues and downtimes & speed up infra work for the team. Almost all major platforms and cloud providers like AWS support Terraform. Terraform is well documented so if you want to read more about Terraform or any Terraform Provider then you can check the official documentation.
Bonus Example using Terraform AWS:
Let’s see one more example of deploying infrastructure with Terraform to create basic infra on the AWS cloud:
provider "aws" {
  access_key = "YOUR_AWS_ACCESS_KEY" # you can get it in profile>Security credentials
  secret_key = "YOUR_AWS_SECRET_ACCESS_KEY" # you can get it in profile>Security credentials
  region = "YOUR_AWS_REGION"
}

resource "aws_instance" "example_instance" {
    ami           = "ami-057752b3f1d6c4d6c" #confirm this value from aws portal it might be different for different os & region
    instance_type = "t2.micro"
    key_name      = "YOUR LOGIN KEY" #use an existing key or create using terraform resource
}

resource "aws_eip" "example_ip" {
   instance = aws_instance.example_instance.id
}

output "instance_public_ip" {
    value = aws_eip.example_ip.public_ip
}Code language: PHP (php)
*After creating resources using the above example in AWS please destroy all the created resources using terrafrom destroy command otherwise it might add up to your bills
Some points from the above example:
- Resource Attribute Reference: In the above example, while creating public IP we want to associate it with the AWS instance we are creating as example_instance, so we passed the instance key with its value. In Terraform to access any resource we first mention the provider name and then the resource type (aws_instance ), then the resource name (example_instance) & then which attribute we want to access, which is id, so the value will be
aws_instance.example_instance.id - Other than resource blocks you can see there is one output block which is a kind of block used to print a value as std output when we apply this code. It takes one argument which is value. so in this case the IP AWS provided you, you will see it on your screen.
If you liked our thoughts on Terraform, you should check out more of our posts on coding practices like preventing microservice architecture failures.